Brakes____
This section of the kart need not necessarily be done next in the stage of making this kart, it can be done/ fitted at any stage of the karts construction.
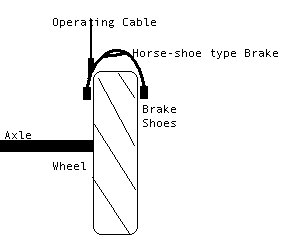
Not to worry we will still go through the ideas and workings behind the brakes for this simple wooden kart. The simplest and most available brakes are of course off a bicycle and as this is a relatively small and light kart they will suffice although the kart itself may be very cruel on brake pads. The brakes which I suggest to use are of the old "horse shoe" type, cable operated requiring only one mounting bolt. In saying this there is no reason that if you can get your hands on some sort of a disc brake off a bicycle/ scooter to use it if you are technically minded to adapt it to mount on the rear axle.
However the brakes I suggest in using are suited to the small bicycle wheels I suggest in using for the rear wheels. Basically what happens is that the brakes off any bike can be used to operate on the actual rims of the rear wheels in order to slow the kart down.
There is a brake operating on both of the rear wheels. If you are adventurous enough then there is no reason why there can't be brakes on the front wheels! Front Brakes would be much better and safer.
Below is an overview of the layout of the brakes and the runner (the length of wood onto which the brakes are affixed to). There are no actual measurements for this part of the kart and rely mainly on a bit of common sense on your part. The brakes are easily mounted to this runner via one single bolt which would be part of the brake. Positioning of the runner and subsequently the brakes are determined by the size of the wheels.
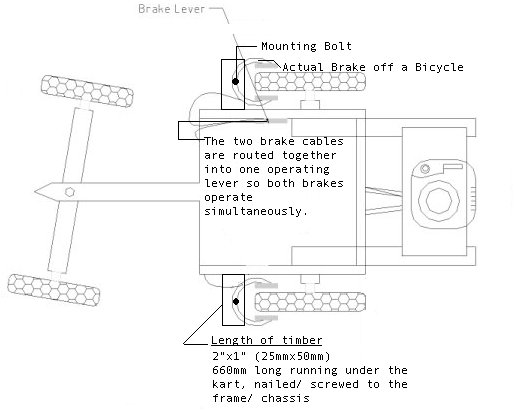
As one can see from the picture above the two separate brake cables are routed/ joined together so they can be operated as one. Below one can see the actual lever and how the cables come together to work as one. To operate the lever all one has to do is to operate the lever (push the lever away from you).
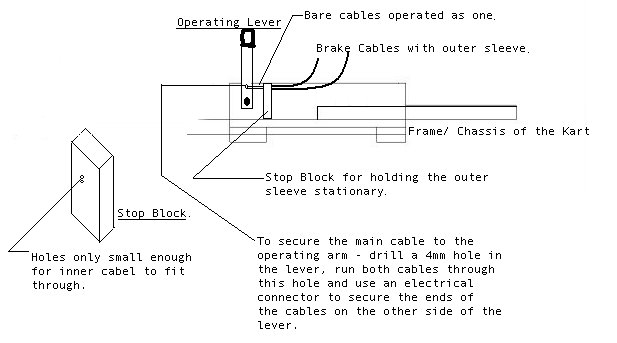
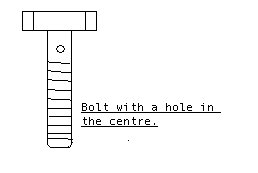
It looks more complicated than it really is. Basically a metal/ wooden piece 1 ft long (300mm) is bolted to the side piece on the kart allowing this to pivot. Then on the top of this lever a knob can be attached. What one must do then is to drill a hole 4mm approx. in this metal/ wooden arm to allow the cables to be attached to this arm. The bare cable run through this hole and are secured on the other side of the lever with an electrical connector or a bolt with a hole in the middle of it which the cable can be secured with.
Another item which has to be included is the "stop block". Basically all this is to stop the outer cable been operated/ moved instead of the inner main cable. All it is, is a piece of wood 20mm thick x 40mm wide x 60mm long with two 2mm holes in it for the inner cables only to pass through.
If the lever is a bit stiff, a return spring can be attached to the lever to release the cables/ brakes and to return the lever to it's original position.
Return to Wooden Kart Main Page